In a previous article I wrote about Getting Started with Github Actions .
In it, I talk about the basics of Actions, how they work, what the language looks like and how you can get started. If you’ve never used Actions before, I highly recommend you have a quick read of that before reading this, as I build on some of the ideas presented there.
Continuous Integration (CI) versus Continues Deployment (CD) versus Continuous Delivery (unhelpfully, also CD)
Put simply, continuous integration is the act of continually moving your changeset into the wider codebase, as frequently as it makes sense for your use case. CI is an essential practice because it drives us as engineers to produce smaller changes more often, and these small changes tend to be less risky individually. Those small changes also lead us to deliver value to our users more rapidly, and more often.
Continuous deployment is the engineering decision to ship validated or verified changes to production environments as often as practical. The decision to continually deploy tends to be made for the same reasons as we choose to continuously integrate. It’s about reducing risk, making improvements available sooner, and building trust with users and with our less technology-focused colleagues.
The natural extension of continuous deployment is continuous delivery. While continuous delivery has become an umbrella term to describe all of the bits and pieces that contribute to it, I do see these things as separate concepts. The key difference then is that continuous deployment is an engineering decision to ship code to production. Continuous delivery is the product or broader business decision to make the features that our code provides, available to users.
Each concept requires the predecessor to work, but it can be a valid choice to stop at any of these points and not continue on. My own bias is to adopt continuous delivery as a fundamental practice, but your own operating context will have impacts on what parts of this you can and can’t do.
Continuous Delivery is a foundational skill that your organisation needs to be good at if it is to remain responsive and ’lowercase a’ agile.
In the previous article, I stated:
More concretely, a decent CI/CD solution will:
- Build your code
- Run the tests
- Deploy it to an environment
- Roll-back if there is an issue
My initial implementation of Github Actions saw me using the tool primarily for continuous integration. However, I’ve recently expanded that to include continuous deployment (and since I’m not using feature flags yet, this technically qualifies as continuous delivery if only as a side effect).
Github Actions now owns artefact build across all environments.
Previously, my create-rc.yml workflow built a container in dev, tested that and then told Heroku that the build is good, and to cut a release.
Heroku then would pull the code, build it and release it to my dev environment. I wasn’t actually running the code I tested, I was running code built from the code I tested. This has been the source of subtle but pernicious bugs for me in the past. My rule of thumb is that you want to build your release candidate once and pass it through environments. That way you know for sure, and can prove in an auditable way, that this particular code is running in this specific place.
Note: The Heroku CLI is bundled as standard on Github Actions runners. I couldn’t find this documented anywhere and literally only stumbled on it in a fit of frustration at midnight last night. My new heuristic is that if you need a specific tool, assume it’s on the runner but isn’t necessarily up to date. If your dependency isn’t there, then you should try to work around it.
I assumed that Heroku CLI wouldn’t be there and spent a long time trying to fight shadows. Don’t be like me.
Here’s a high-level summary of the work I did to make my builds work the way I’ve described above, with one RC being deployed to many environments:
- Have
create-rc.ymltreat the docker image it makes like the one RC, rather than as a means of delivering integration tests. - Improve the tagging process so that we produce a docker image with the right naming conventions for Heroku.
- Push the image to the Heroku docker registry, where we can persist it across builds and environments.
- Introduce a new job to deploy the verified image to the right Heroku environment.
- Introduce a new workflow with a different trigger, to take the already validated image and redeploy it to production.
Overall the changes weren’t massive, but I definitely cut myself on some rough edges (documentation being a big part of that).
These steps build my image, tag it and send it off to Heroku. That’s step 1, 2 and 3 done in ~20 lines:
- name: Login to Heroku Registry
  env:
    HEROKU_API_KEY: ${{ secrets.HEROKU_TOKEN }}
  run: heroku container:login

- name: Build and push
  env:
    HEROKU_API_KEY: ${{ secrets.HEROKU_TOKEN }}
  run: heroku container:push -a dev-api-spring-boot web

- name: Create tarball from docker image
  # Heroku has a naming convention for images, it's important to match that.
  run: docker save registry.heroku.com/dev-api-spring-boot/web > spring-boot-api-candidate.tar

- name: Upload image tarball for next job
  uses: actions/upload-artifact@v2
  with:
    name: spring-boot-api-candidate.tar
    path: spring-boot-api-candidate.tar
These steps close out the only actual building of code that I do. In every other case, I get code from one place to the other by redeploying code I already know to be good. It’s important to note here that I’m trying to keep build time low by using capabilities baked into the actions runner, rather than using externally published actions.
It’s also important to note that if you use Heroku commands the way I am, you lose visibility of fine-grained build actions because most of that code lives in your docker file. By that, I mean that all I can see in this code is that Heroku is pushing a container. I can’t see how it’s built. For that, I need to go to my Dockerfile, which in this case looks like this:
FROM gradle:6.5.1-jdk14 as build-stage

WORKDIR /build
COPY src /build/src
COPY gradlew /build/gradlew
COPY gradle /build/gradle
COPY build.gradle /build/build.gradle
COPY settings.gradle /build/settings.gradle

RUN /build/gradlew clean build -x test

# Running container build begins
FROM adoptopenjdk:14.0.1_7-jre-openj9-0.20.0-bionic

# copy application JAR
COPY --from=build-stage build/build/libs/spring-boot-api-*.jar /spring-boot-api.jar

# specify default command
# The command to run this in local mode would be docker run -p 8080:8080 -e JAVA_OPTS="-Dspring.profiles.active=local -Dserver.port=$PORT" registry.heroku.com/dev-api-spring-boot/web
CMD ["sh", "-c", " java ${JAVA_OPTS} -jar /spring-boot-api.jar"]
Now I have two sets of build logic in two places, which isn’t perfect, but given how docker works, it’s tolerable. An example of the impact this has is that if I want to stop running tests while I build the image (because I unit test and integration test within the workflow), I need to add -x test to the end of my Gradle command in the Dockerfile as seen here. It adds a little bit of cognitive burden. Okay for now but not ideal.
Speaking of unit tests, since I want to cut down my build time, I can run them in parralel! Hooray for Github’s jobs are parralel by default stance!
unit-test:
  runs-on: ubuntu-latest
  needs: build-image # build-image is the name of the first job in this workflow, it's where the Heroku code above lives.

  steps:
    - name: Check out code
      uses: actions/checkout@v2

    - name: Set up JDK 14
      uses: actions/setup-java@v1
      with:
        java-version: 14

    - name: Make gradle wrapper executable
      run: chmod +x gradlew

    - name: Run Unit Tests
      env:
        PORT: 8080
      run: ./gradlew clean test
Releasing a verified image to Heroku
The great thing is that we only need to add one more step to our create-rc.yml (although this file should probably be renamed to dev-build or something simillar).
What I’m saying below is that at the end of my build, only when I’ve got green unit tests and green integration tests, I want that image that I’ve already pushed, to be activated in Heroku.
dev-deploy:
  runs-on: ubuntu-latest
  needs: [integration-test, unit-test]

  steps:
    - name: Login to Heroku Registry
      env:
        HEROKU_API_KEY: ${{ secrets.HEROKU_TOKEN }}
      run: heroku container:login

    - name: Release to Heroku dev
      env:
        HEROKU_API_KEY: ${{ secrets.HEROKU_TOKEN }}
      run: heroku container:release -a dev-api-spring-boot web
I don’t have to care about artefact handling or pass in a tarball. The image is always current, and I just choose whether or not I want to make it active. One of the drawbacks here though is that I could get an image pushed that fails unit tests or integration tests. This is mitigated by the image remaining inactive until I release it. There is an edge case here that if I had to rollback, I might roll back to a bad image but that’s a problem for improvement later - and I’ll never have a broken image that won’t start because if the image won’t build, the build job will fail.
So with the above changes, we have a dev build process entirely owned by Github Actions. In theory, I could rip out Heroku and point to AWS ECS or somewhere else quickly. I’m using my platform provider for its platform, not for the stepladder on to the platform!
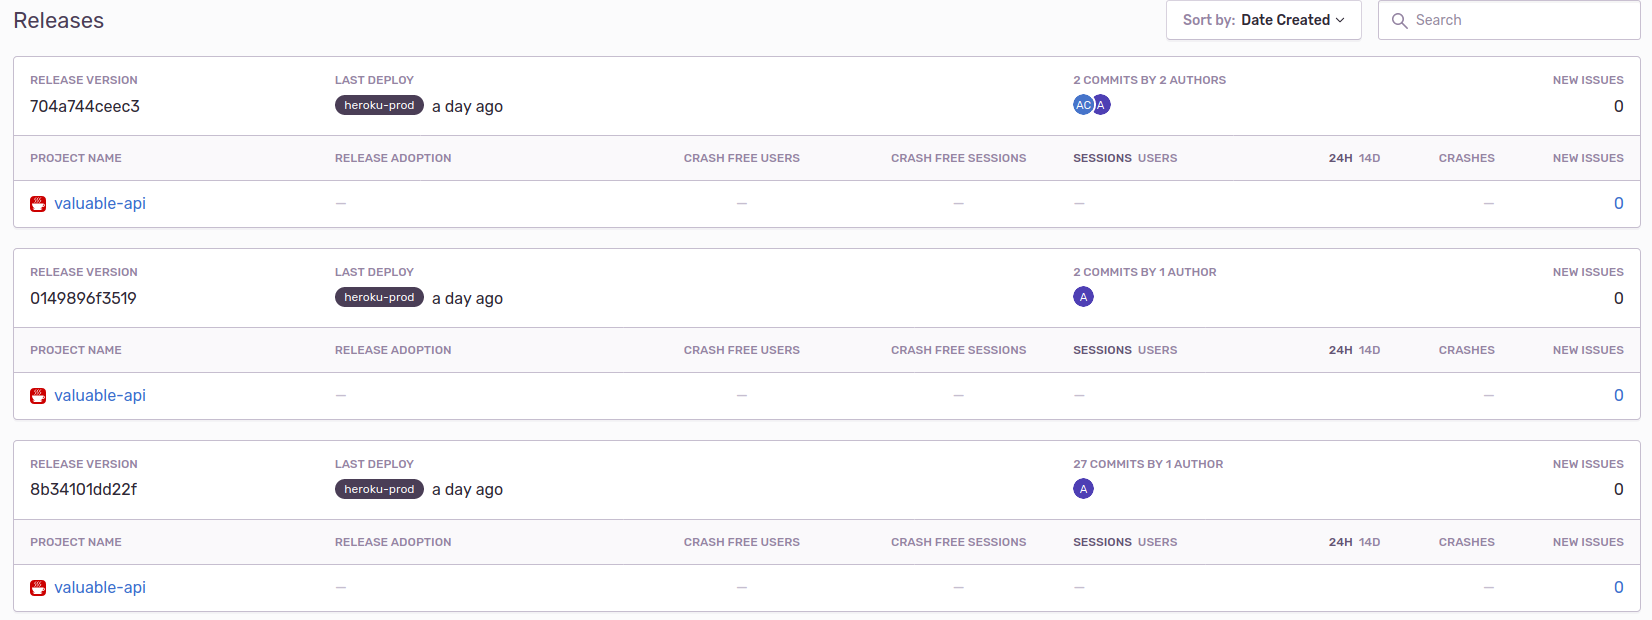
Releasing to Production with Sentry Integration
My procedure is that a release to production is triggered on a push to main, and the only way to push to main is via a merged commit.
This procedure needs to do a few things:
- Take a validated image from an upstream environment and retag it.
- Push that retagged image back to Heroku
- Release the image
- Create a new release version in Sentry
I have some intermediate steps here that I want to use to tie things together from an audit perspective, but I’m waiting on some feedback from elsewhere before I can do that. Here are the steps for my release job, note how similar it is to my dev release methodology.
- name: Login to Heroku Registry
  env:
    HEROKU_API_KEY: ${{ secrets.HEROKU_TOKEN }}
  run: heroku container:login

- name: Pull dev image
  run: docker pull registry.heroku.com/dev-api-spring-boot/web

- name: Re-tag dev as prod
  # Again, Heroku expects a naming convention here, so we just have to comply.
  run: docker tag registry.heroku.com/dev-api-spring-boot/web registry.heroku.com/api-spring-boot/web

- name: Push production image
  run: docker push registry.heroku.com/api-spring-boot/web

- name: Push Prod Image
  env:
    HEROKU_API_KEY: ${{ secrets.HEROKU_TOKEN }}
  run: heroku container:release -a api-spring-boot web
The post-processing I do on a release is much more interesting then docker jiggery-pokery:
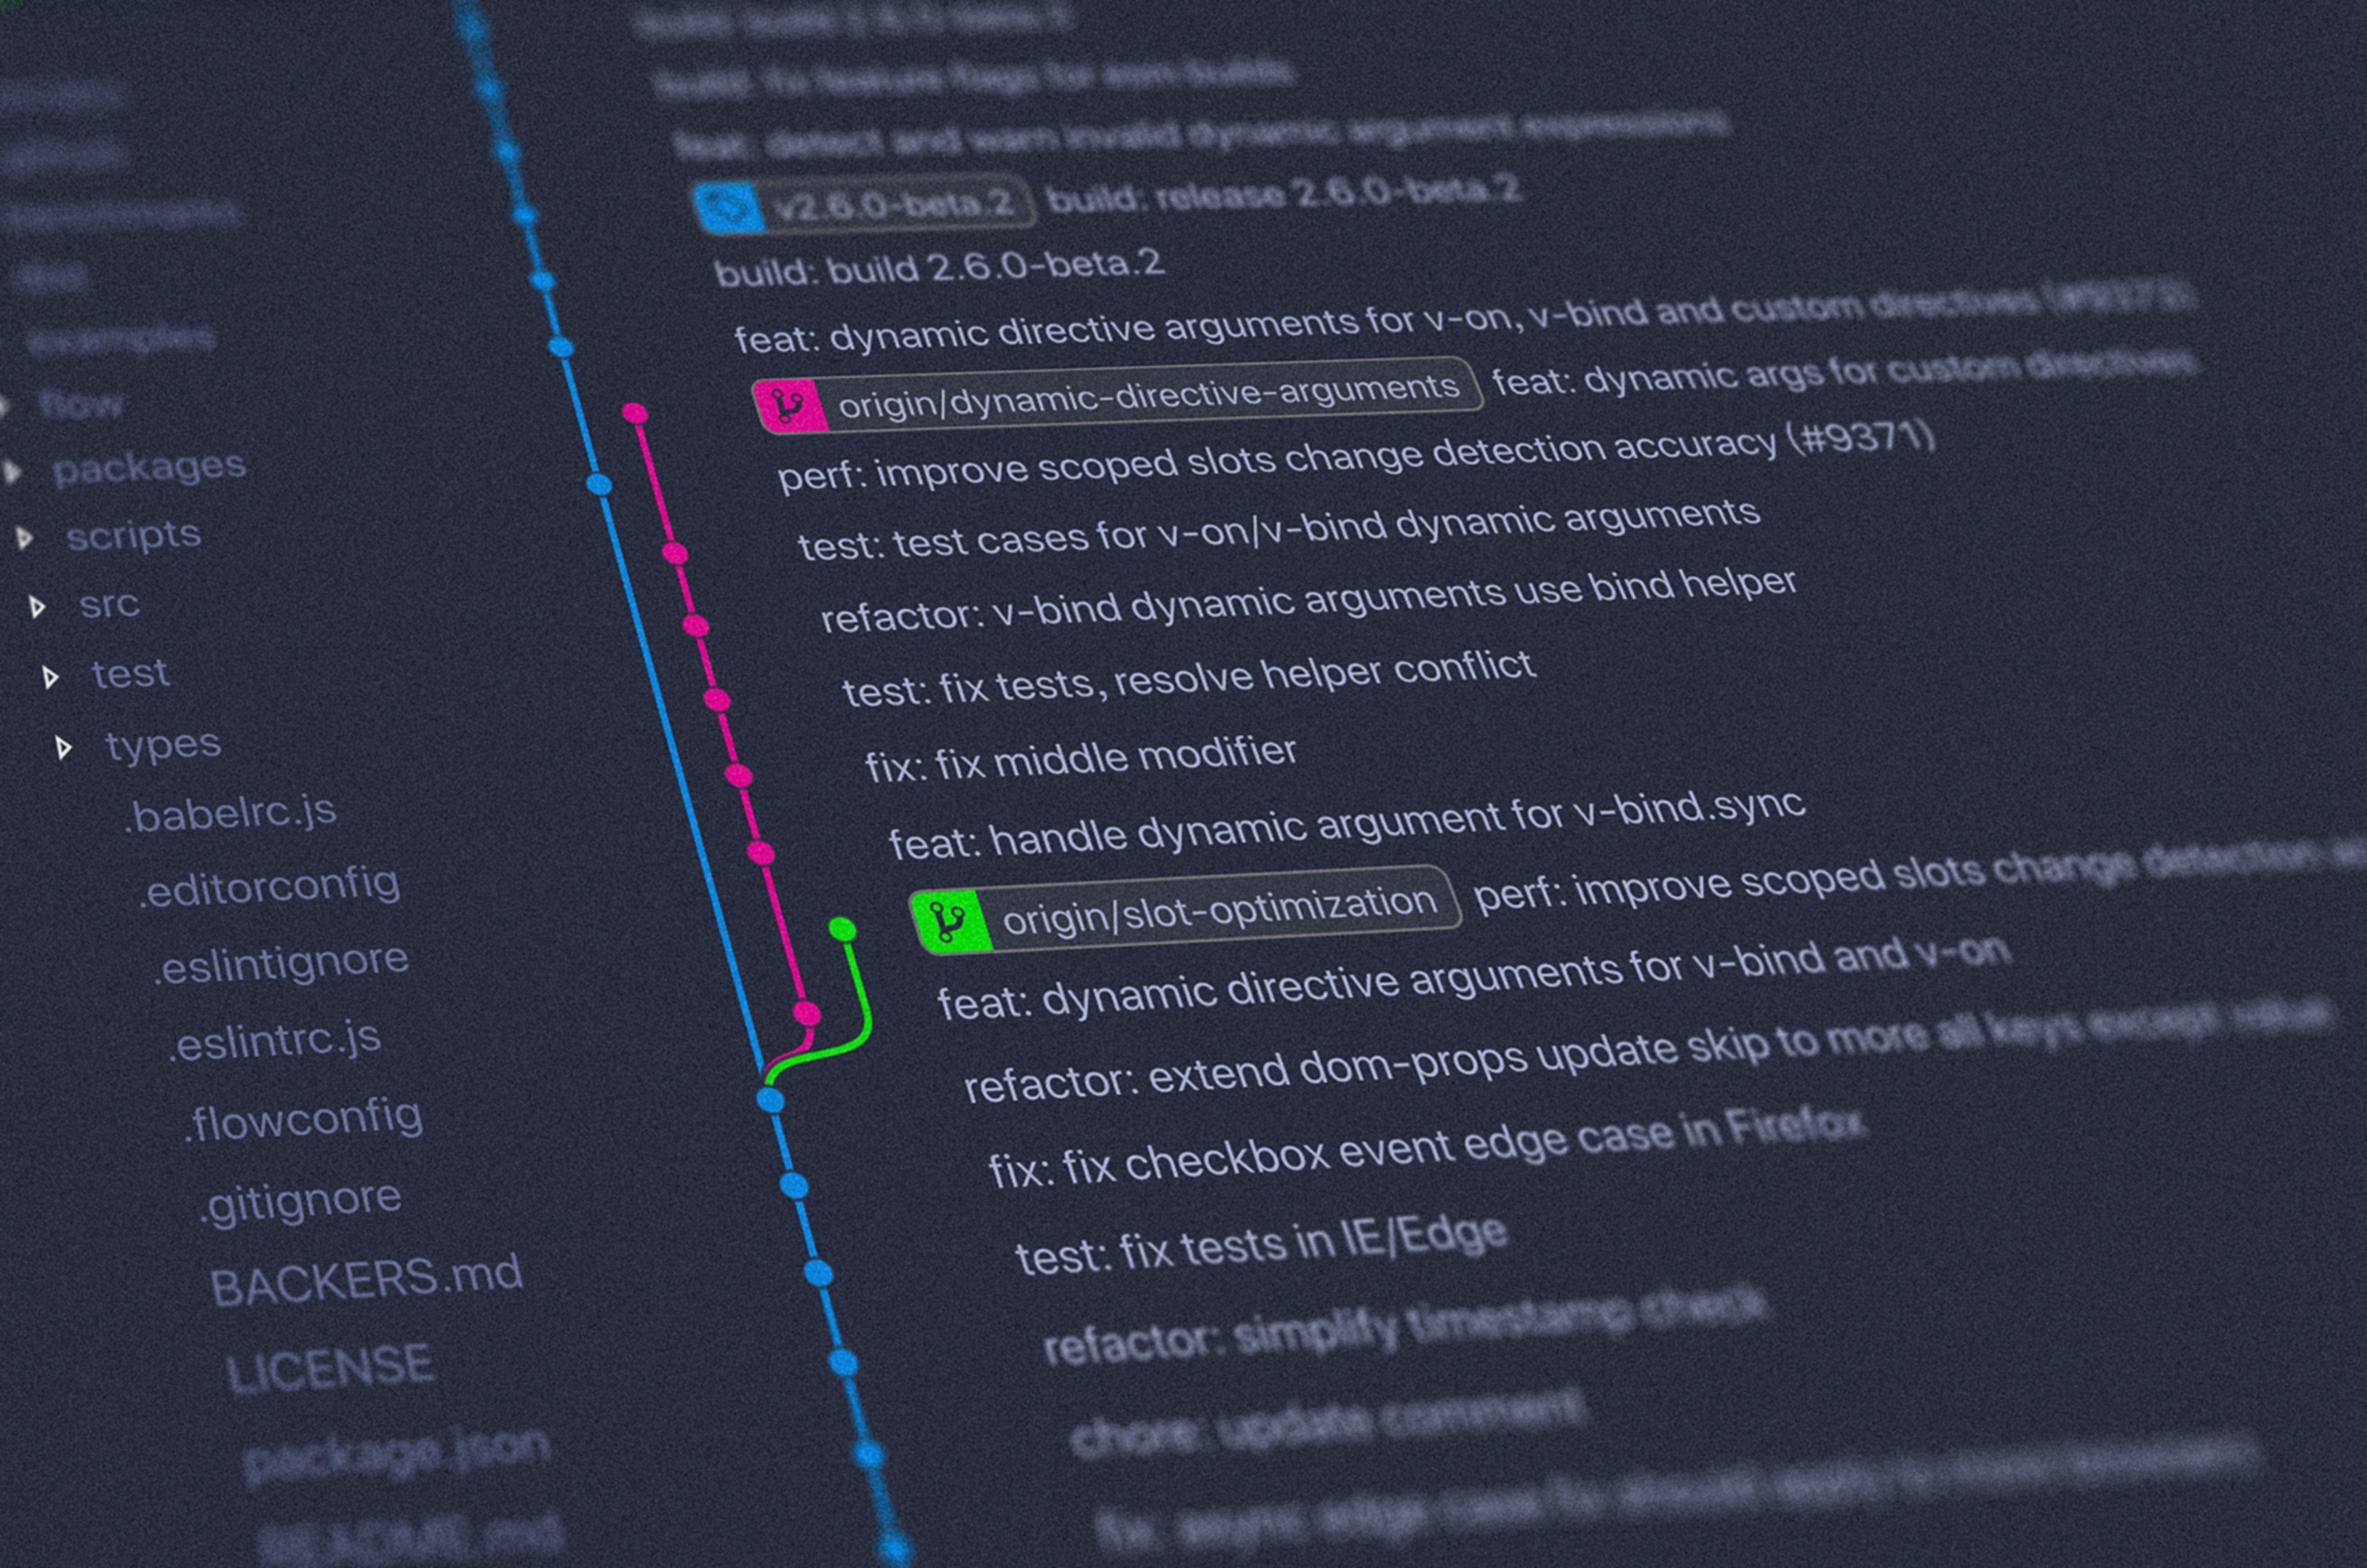
- I want to grab the entire codebase because I want that delicious commit history.
- I want to create a new tag for this production release
- I want to get all of the commit descriptions between the new tag, and the previous tag, and then filter out some commits that aren’t interesting for given values of interesting
- Then cut a release for Github using the commits as a changelog
- Finally, use Sentry.io for crash reports, and I want to tell Sentry about the new version so that I can track where issues might have been introduced.
- name: Checkout code
  uses: actions/checkout@v2
  with:
    # Fetch depth grabs the entire history, though I'm sure I could grab the commits since the last tag if I really wanted.
    fetch-depth: 0

# I encountered an issue here so have left this commented out. It's not a part of my workflow, but hopefully one day it'll create tags for me
# Leaving this out for now - to use the output of tag in the below release use ${{ steps.create_tag.outputs.new_tag }}
#      - name: Bump version and push tag
#        id: create_tag
#        uses: mathieudutour/github-tag-action@v4.5
#        with:
#          github_token: ${{ secrets.GITHUB_TOKEN }}
#          release_branches: dev

- name: Generate release notes
  # Important note: I use https://github.com/angular/angular/blob/master/CONTRIBUTING.md#commit for commit format. It makes it really easy to filter commits in the way I've done below.
  run: git log $(git describe --tags --abbrev=0)..HEAD --pretty=format:"%s" -i -E --grep="^(build|ci|docs|feat|fix|perf|refactor|style|test)*feat|perf|fix" > release-notes.txt

# I don't want to cut releases with no info in them! That's why this too is not currently part of my workflow
#      - name: Create Github Release
#        id: create_release
#        uses: actions/create-release@v1
#        env:
#          GITHUB_TOKEN: ${{ secrets.GITHUB_TOKEN }}
#        with:
#          tag_name: ${{ github.sha }}
#          release_name: Release ${{ github.sha }}
#          body_path: release-notes.txt
#          draft: false
#          prerelease: false

- name: Create Sentry release
  uses: tclindner/sentry-releases-action@v1.2.0
  env:
    SENTRY_AUTH_TOKEN: ${{ secrets.SENTRY_AUTH_TOKEN }}
    SENTRY_ORG: my-sentry-org
    SENTRY_PROJECT: spring-boot-api
  with:
    tagName: ${{ github.sha }}
    environment: heroku-prod
The net effect of the above is that I get to take a previously validated image. When I choose (via merged PR), I can automatically redeploy quality code to prod without rebuilding. The neat interplay here is that when I open that PR, my project will build, and use that same build to decide whether or not I can merge. As soon as I merge, the code is in prod without a rebuild. It’s nice.
With a new release being cut in Sentry each time, I can resolve errors that I’ve introduced down to at worst, a PR or at best, an individual commit. Also nice!